A strong onboarding process is the difference between an accounting client who stays for a decade and one who leaves after the first tax season. Yet most firms still onboard new clients with scattered emails, phone calls, and shared folders — chasing the same documents over and over.
This guide walks you through a step-by-step accounting client onboarding process, gives you a ready-to-use document checklist, and shows you how to automate the parts that eat into your billable hours.
Why Client Onboarding Matters for Accounting Firms
The first 30 days of a new client relationship set the tone for everything that follows. When a client has to resend the same document twice — or waits a week without hearing from you — they start wondering if they picked the wrong firm.
A structured onboarding process does three things:
- Reduces back-and-forth. Collecting the right documents upfront means less time chasing missing information weeks later.
- Sets clear expectations. Both sides understand the scope of services, communication preferences, and deadlines before work begins.
- Creates a repeatable system. Instead of reinventing the process for every new client, your team follows the same proven workflow every time.
Firms that invest in onboarding keep clients longer, catch errors before tax season, and spend less staff time on follow-up emails. The upfront work pays for itself within the first engagement.
Step-by-Step Accounting Client Onboarding Process
Here is a repeatable seven-step process you can adapt to your firm, whether you handle bookkeeping, tax preparation, advisory services, or all three.
Step 1: Initial consultation and scope agreement
Before any paperwork, hold a discovery meeting (in person or by video call) to understand the client's needs. Cover these points:
- What services do they need? (Bookkeeping, tax prep, payroll, advisory)
- What is their business structure? (Sole proprietor, LLC, S-Corp, C-Corp, partnership)
- What accounting software do they use, if any?
- What is their fiscal year end?
- Are there any immediate deadlines or outstanding filings?
Write down the answers. They shape everything that follows — the engagement letter, the document request, and the software setup.
Step 2: Send the engagement letter
The engagement letter is your contract. It spells out the services you will provide, the fees, the timeline, and each party's responsibilities. Send it for signature before you begin any work.
A good engagement letter covers:
- Scope of services (be specific — "monthly bookkeeping and annual tax preparation" is better than "accounting services")
- Fee structure and payment terms
- Client responsibilities (providing documents on time, responding to queries)
- Confidentiality and data protection terms
- Termination clause
Use e-signature tools to make this step fast. The longer an engagement letter sits unsigned, the higher the risk of scope creep or misaligned expectations later.
Step 3: Collect client information and documents
This is where most firms bleed time. You need personal details, business information, tax documents, financial statements, and access credentials — often from clients who are busy and unfamiliar with accounting terminology.
Send a single, organized request that lists exactly what you need. Group documents by category so clients can work through them systematically rather than guessing what "prior year financials" means. (See the full checklist in the next section.)
Step 4: Set up accounting software and integrations
Once you have the client's information, set up their accounts. Create the client profile in your practice management software, get access to their accounting software (QuickBooks, Xero, FreshBooks), connect bank feeds, configure the chart of accounts, and set up payroll if included.
If the client is switching from another firm, request access to the previous accountant's files and software. A clean handoff prevents gaps in the financial records.
Step 5: Review historical records
Before you start regular work, review what you have received:
- Check prior year tax returns for accuracy and carryforward items
- Reconcile opening balances in the accounting software
- Identify any outstanding filings, unpaid taxes, or compliance gaps
- Note any unusual transactions that need clarification
This review often surfaces questions for the client. Batch these into a single follow-up rather than sending five separate emails.
Step 6: Send a welcome package
A short welcome email tells the client that onboarding is complete and sets expectations for the ongoing relationship. Include a summary of services and key deadlines, your firm's preferred communication channels, the primary contact person, and instructions for submitting documents throughout the year.
This is also the right moment to introduce any tools you use for ongoing document collection, so clients know where to upload receipts, statements, or other records as the year progresses.
Step 7: Schedule the first recurring check-in
Set a date for the first monthly or quarterly review within the first two weeks. This early check-in catches misunderstandings while they are still small and shows the client you are paying attention.
Essential Documents to Collect from New Clients
Incomplete document collection is the single biggest bottleneck in onboarding. Clients forget items, send the wrong version, or do not understand what you are asking for. A detailed checklist grouped by category eliminates the guesswork.
Client and business information
- Full legal name (and any DBAs or trading names)
- Business address and mailing address
- Phone number and email address
- Social Security Number or Employer Identification Number (EIN)
- Business structure and formation date
- State(s) of registration
- Industry or NAICS code
- Fiscal year end date
- Names and SSNs of all owners, partners, or officers
Business formation documents
- Articles of Incorporation or Organization
- Operating Agreement or Partnership Agreement
- Business licenses and permits
- EIN confirmation letter (IRS CP575 or 147C)
- State registration certificates
- Any amendments to formation documents
Tax documents
- Prior year federal and state tax returns (2-3 years)
- Quarterly estimated tax payment records
- Sales tax returns and permits
- W-2s and 1099s issued and received
- Property tax statements
- Any IRS or state correspondence (notices, audits, payment plans)
- Depreciation schedules
Financial statements and records
- Balance sheet (most recent)
- Profit and loss statement (current year and prior year)
- Cash flow statement
- General ledger and chart of accounts
- Trial balance
- Bank statements (all business accounts, last 12 months)
- Credit card statements (last 12 months)
- Loan agreements and amortization schedules
Payroll documents
- Payroll register and records (current and prior year)
- Employee W-4 forms
- Contractor W-9 forms
- Quarterly payroll tax filings (Form 941)
- State unemployment tax records
- Workers' compensation policy
- Benefits enrollment documentation
Banking and payment details
- Bank account details (account numbers, institution names)
- Authorized signers on accounts
- Merchant processing statements
- Outstanding loan or line of credit details
Software and system access
- Login credentials for accounting software (QuickBooks, Xero, etc.)
- Access to previous accountant's files or portal
- Payroll provider login (ADP, Gusto, Paychex)
- Point-of-sale system access (if applicable)
- Bank and credit card portal logins for feed connections
You will not need every item for every client. A sole proprietor needs a fraction of what a multi-member LLC with payroll requires. Start with the full list and pare it down based on the client's situation — that way you catch gaps upfront rather than midway through the engagement.
For a related checklist focused specifically on tax season, see our tax return checklist for clients.
Onboarding Automation for Accounting Firms
Every hour you spend emailing document lists, following up on missing items, and sorting uploaded files by hand is an hour you cannot bill. Here are the parts of onboarding worth automating first.
Automated document collection
Instead of emailing a PDF checklist and hoping clients attach the right files to their reply, use a dedicated upload page where clients can drag and drop documents into labeled categories.
With a tool like File Request Pro, you can create a branded upload page that lists exactly what you need — organized by category, with descriptions to help clients understand each item. Clients upload files at their own pace, and everything routes directly to your cloud storage (Google Drive, OneDrive, SharePoint, or Dropbox), organized by client name or any field you choose.
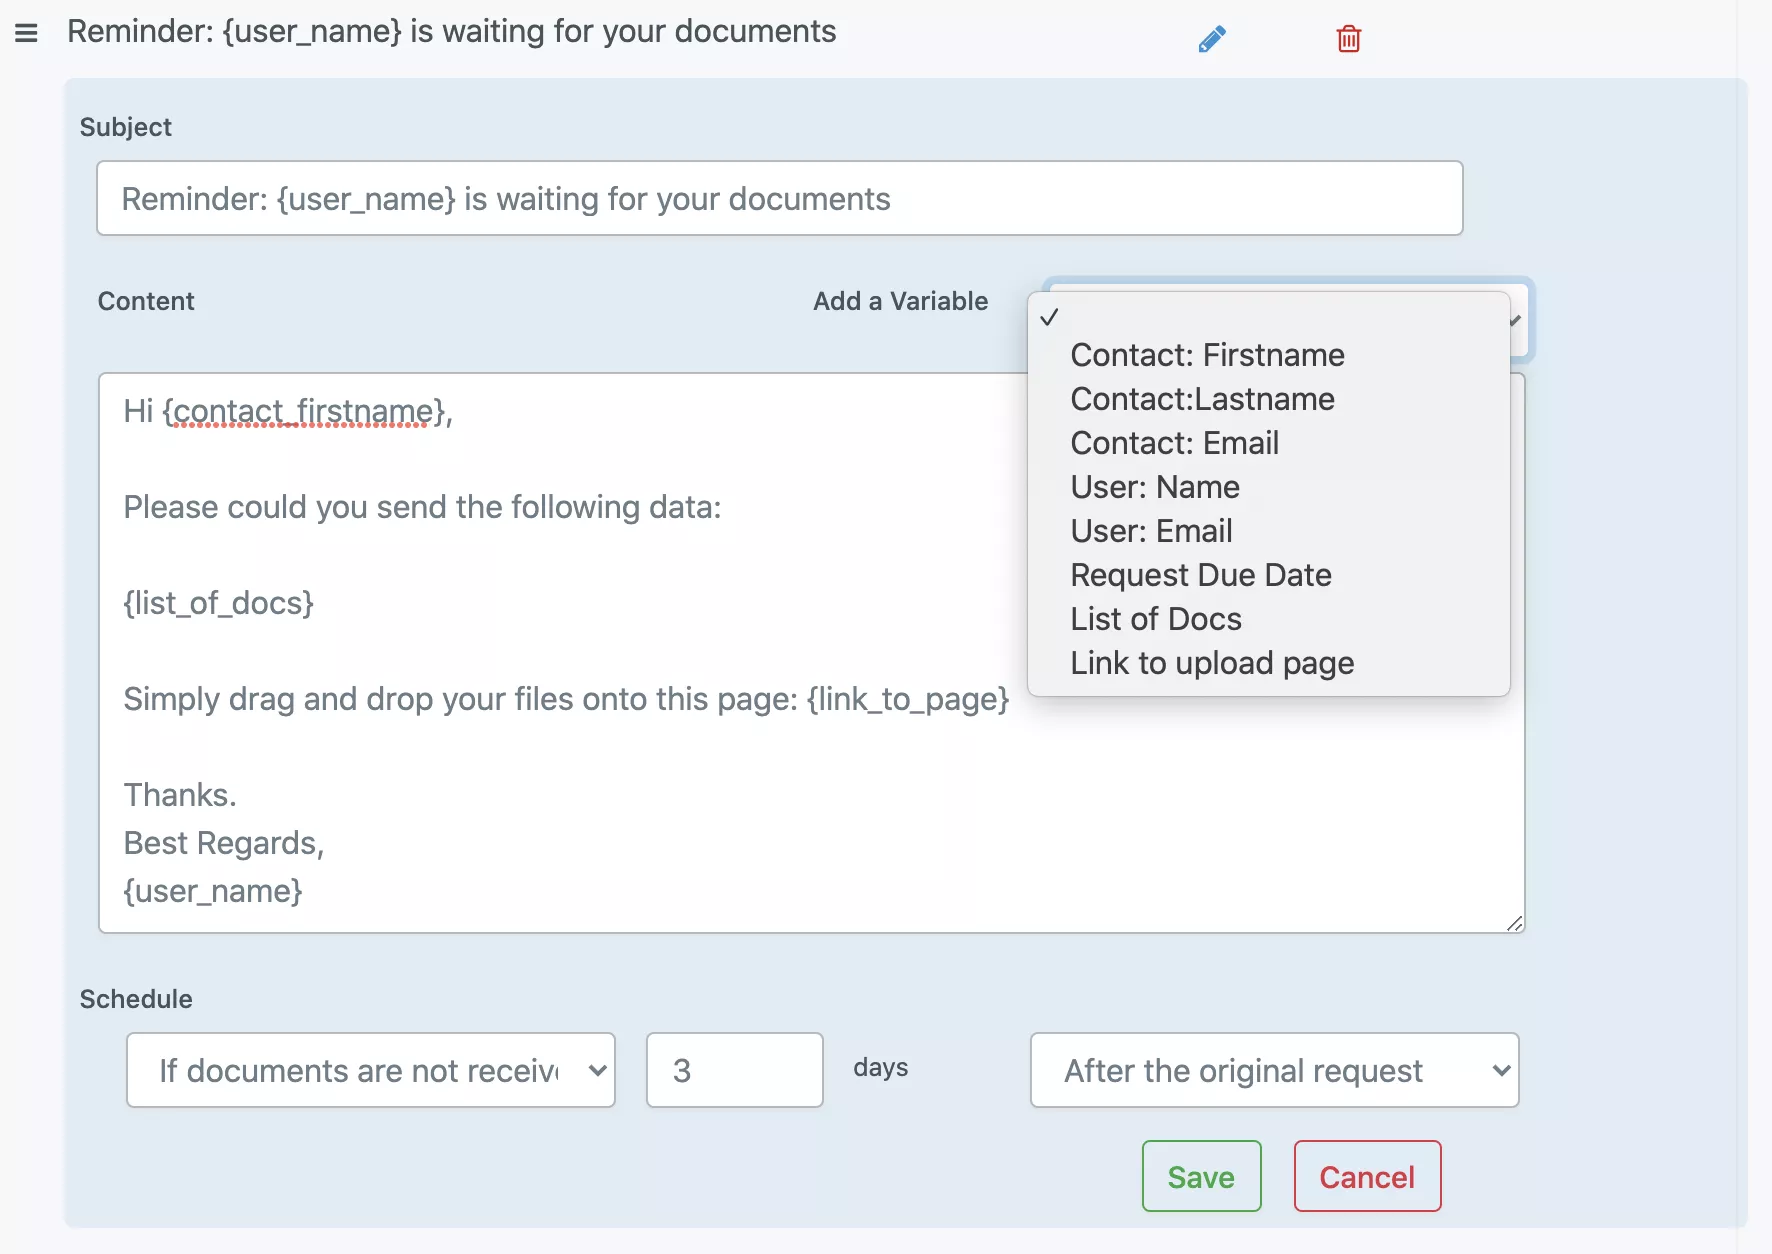
Automated reminders
Chasing clients for outstanding documents is the biggest time drain in onboarding. Automated reminders handle it for you — without adding to your team's to-do list.
Set up a reminder sequence: a nudge three days after the initial request, a second reminder at seven days, and a final notice before your deadline. Good reminder tools let you customize the message and target only clients who still have items outstanding — so clients who already submitted everything are not pestered.
Automated file organization
When documents arrive by email, someone on your team downloads, renames, and files each one by hand. Automated file routing skips all of that — uploaded documents land in the correct client folder in your cloud drive the moment they are submitted.
This matters most during tax season. When you onboard ten new clients in the same month, automatic file routing prevents misfiling and saves hours of admin work each week.
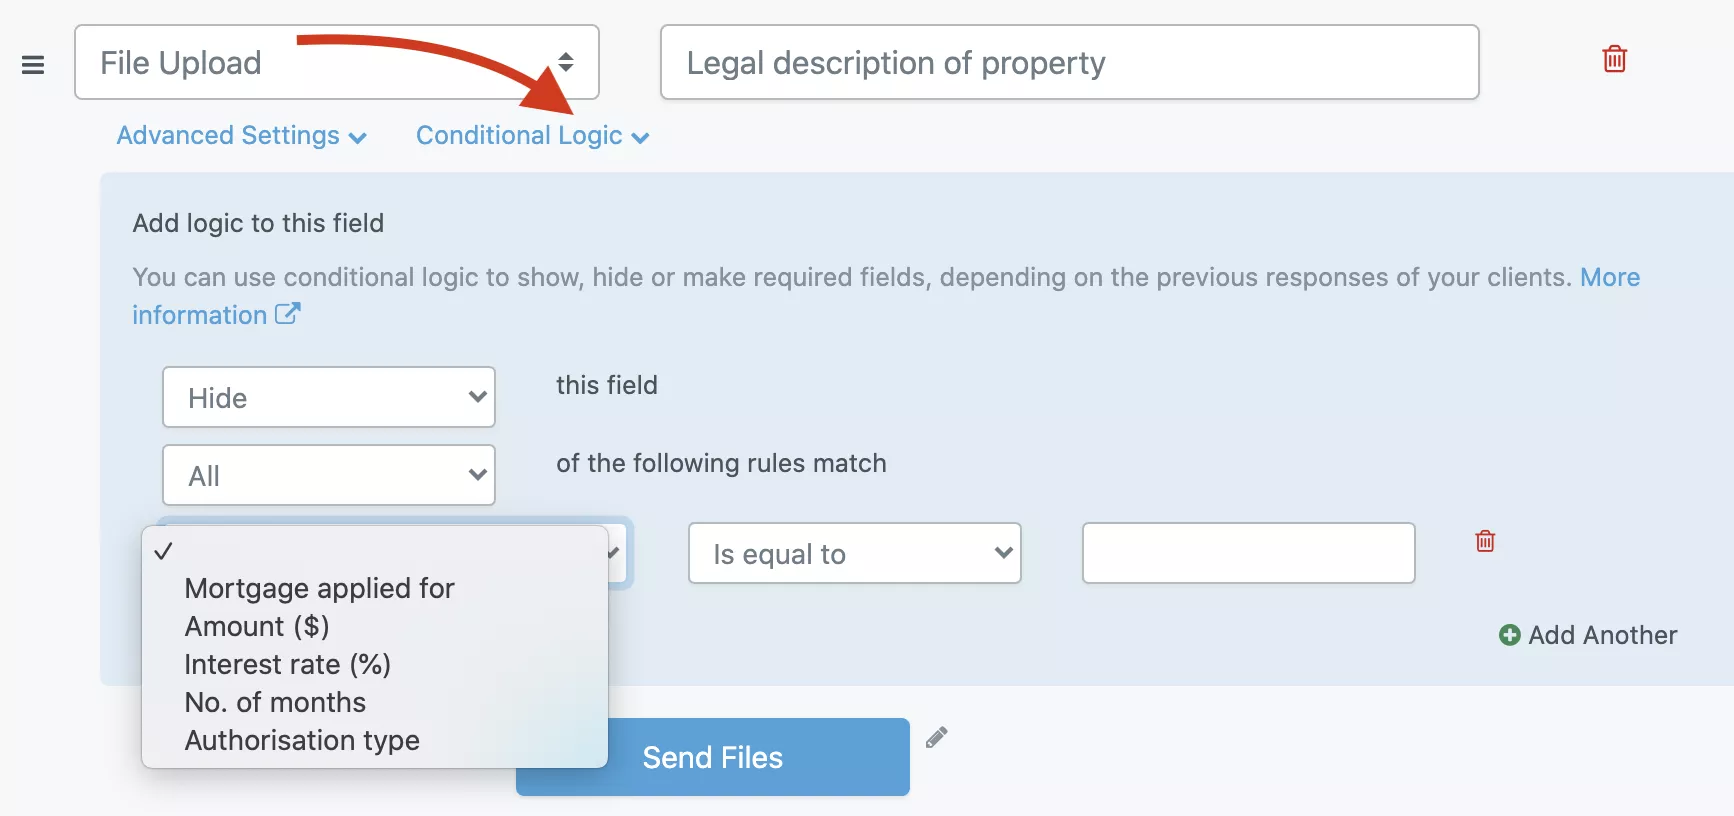
Conditional logic for different client types
Not every client needs the same documents. A sole proprietor does not need a Partnership Agreement. A business with no employees does not need payroll records.
Use conditional logic in your intake forms so the document request adapts based on the client's answers. If they select "Sole Proprietor" as their business type, the payroll section does not appear. If they indicate they have employees, the form expands to include W-4s, 941 filings, and benefits documentation.
This reduces confusion for the client and ensures you only ask for what is relevant.
Common Onboarding Mistakes and How to Avoid Them
Even well-run firms trip over the same onboarding mistakes. Here are the most common ones and how to fix them.
Asking for everything at once
Sending a 40-item document list in a single email overwhelms clients. Many will open it, feel daunted, and close it — intending to "deal with it later."
Fix: Group documents by priority. Start with the items you need immediately (engagement letter, EIN, prior year returns) and follow up with secondary requests once the basics are in place. If you use an upload page, organize items into clear sections so the task feels manageable.
Not setting a deadline
Without a clear deadline, document requests sit in your client's inbox indefinitely. "Please send these at your earliest convenience" means different things to different people.
Fix: Give a specific date. "Please upload your documents by March 15" is far more effective. Tie the deadline to a real consequence: "To file your return by the April deadline, we need your documents by March 15."
Relying on email for file collection
Email works for communication. It fails at collecting documents. Files get buried in threads, attachments hit size limits, sensitive documents sit unencrypted in inboxes, and you have no way to see which client has submitted what.
Fix: Use a file collection tool or client portal that gives you a single view of what has been received and what is still outstanding. This also gives clients a better experience — they can see their progress and upload files on their own schedule.
No standardized process
When each staff member onboards clients their own way, quality falls apart. One accountant collects everything upfront; another starts work with half the documents and scrambles later.
Fix: Create a documented onboarding workflow with templates, checklists, and assigned responsibilities. Whether you use project management software or a simple shared checklist, the process should be the same regardless of who handles the client.
Skipping the welcome communication
After collecting documents, some firms go silent — the client hears nothing until the work is done. That silence breeds anxiety and erodes the trust you built during onboarding.
Fix: Send a brief confirmation once onboarding is complete. Outline the next steps and provide a timeline. A two-paragraph email is all it takes.
Not requesting access to prior systems
If a client is switching accountants, you need the previous firm's workpapers, depreciation schedules, and software backups — not just the documents the client has on hand.
Fix: Include a records-release authorization in your engagement letter. Have the client sign it early, before you need the records urgently.
How to Send Your Onboarding Checklist to Clients
You have the checklist. Now, how do you get it to clients in a way that makes them act on it?
Option 1: Email with a document list
The simplest approach: email the client a list and ask them to reply with attachments. This works when you have a handful of clients, but it breaks down fast. Files scatter across email threads, you lose track of what arrived, and large files bounce off attachment limits.
Option 2: Shared folder (Google Drive, Dropbox)
Create a shared folder with subfolders for each document category and invite the client to upload. Better than email for organization, but clients need an account to access it, you have to set up folders manually for each client, and there is no way to track progress or send reminders.
Option 3: Dedicated file collection tool
A purpose-built tool like File Request Pro combines the checklist and the upload process into one branded page. You build the form once — listing every document you need with descriptions and categories — and reuse it for every new client.
Key advantages over email and shared folders:
- Your brand, not someone else's. The upload page carries your firm's logo and colors.
- No client login required. Clients open the link, fill in the form fields, and drag and drop their files. No account creation, no app to install.
- Files land where they belong. Uploaded documents route straight to your cloud storage (Google Drive, OneDrive, SharePoint, Dropbox), organized by client name, engagement type, or any field you choose.
- Progress tracking at a glance. See which clients have uploaded documents and which have not — no spreadsheets needed.
- Automated reminders. Schedule follow-ups that go only to clients with outstanding items, so your team stops writing "friendly reminder" emails.
- Conditional logic. Show or hide document requests based on the client's business type, so a sole proprietor never sees a payroll section.
For firms that manage ongoing document collection — not just onboarding but also PBC lists for audits and recurring monthly requests — a dedicated tool pays for itself in hours saved.
Building a Reusable Onboarding Template
The best onboarding processes are templates, not one-off projects. To build a reusable system, start with the full document checklist above as your master template, then create stripped-down variants for common client types (sole proprietors, small LLCs, corporations with payroll). Each variant pulls from the master list but drops the items that do not apply.
Write template emails for each stage: the initial document request, the reminder, the receipt confirmation, and the welcome message. Assign ownership of each step so the process stays consistent as your firm grows.
You can also turn that master template into a guided experience for the client, not just an internal reference. A guided, multi-step version of your onboarding checklist presents your document request as ordered task steps with a progress sidebar and a final sign-off, so a new business client always knows what is left before their file is complete.
For a deeper look at creating structured intake forms, see our guide on client information sheets.
Frequently Asked Questions
What should be included in an accounting client onboarding checklist?
A complete checklist covers client contact information, business formation documents (EIN, Articles of Incorporation), prior year tax returns, financial statements (balance sheet, P&L, cash flow), bank and credit card statements, payroll records, loan agreements, and access credentials for accounting software. The specific items vary by client type — a sole proprietor needs far less than a corporation with employees.
How long should the accounting onboarding process take?
Most firms complete onboarding within two to four weeks. The engagement letter and initial document request should go out within 48 hours of the client agreeing to work with you. Software setup and historical review take one to two weeks once documents arrive. The most common delay? Waiting for clients to submit everything you asked for.
How do I get clients to send documents faster?
Three things move the needle: give a specific deadline tied to a real consequence (like a filing date), make the submission process dead simple (one upload link beats a list of email instructions), and send automated reminders to anyone who has not submitted yet. Most clients are not ignoring you — they are busy. Make the task easy, nudge them at the right time, and most delays disappear.
What is the difference between onboarding and client intake?
Client intake is one part of onboarding. Intake refers specifically to collecting information and documents at the start of the relationship. Onboarding is the broader process: signing the engagement letter, setting up software, reviewing historical records, sending the welcome package, and establishing ongoing communication.
Should I use a client portal or a file upload tool for onboarding?
It depends on your firm's size and workflow. A full client portal (like Canopy or TaxDome) bundles messaging, task management, and document storage into one platform — but it costs more and forces clients to create accounts. A file upload tool like File Request Pro focuses on document collection alone — no client login required — and plugs into the cloud storage you already use. Many firms pair a lightweight upload tool with their existing practice management software and get the best of both.
How do I handle onboarding for clients switching from another accountant?
Add a records-release authorization to your engagement letter and have the client sign it early. You will need the prior firm's workpapers, depreciation schedules, and any software backups on top of the standard document list. Contact the previous accountant right away — response times vary, and waiting can push back your entire setup.
Free Client Onboarding Checklist
Get the complete document checklist for your industry — interactive, with progress tracking.
Use the Free Checklist Tool →