Updated July 2026. Steps and menu labels checked against the current Microsoft Forms sharing panel and the Microsoft 365 admin center.
Need to share a Microsoft Form with people outside your organization, but the option seems locked down? By default, Microsoft Forms restricts responses to internal users only. You need to change two settings — one at the admin level and one on the form itself — to open it up to external respondents.
This guide covers each step: enabling external sharing in the Microsoft 365 admin center, creating shareable links, fixing the greyed-out "Anyone can respond" option, sharing via QR code, and the key differences between personal and organizational accounts.
Personal vs. Organizational Accounts: What You Can (and Can't) Do
The type of Microsoft account you have determines your sharing options. Microsoft Forms behaves differently on a personal account versus an organizational (work/school) account.
| Feature | Personal Account (Outlook.com, Hotmail) | Organizational Account (Microsoft 365 Work/School) |
|---|---|---|
| Share with anyone (no sign-in required) | Yes — on by default | Yes — but admin must enable it first |
| Restrict to organization only | Not available | Yes |
| File upload questions | Not available | Internal respondents only |
| Admin controls | None | Full control via Microsoft 365 admin center |
| Record respondent name | Optional | Yes (for internal); No (for external anonymous) |
| Branching logic | Yes | Yes |
Key takeaway: If you're on a personal Microsoft account, your forms are already shareable with anyone — there's no admin setting to toggle. The steps below apply to organizational (work or school) Microsoft 365 accounts, where external sharing is often disabled by default.
How to Enable External Sharing in Microsoft Forms (Admin Settings)
If you're using Microsoft Forms with a work or school account, your Microsoft 365 administrator controls external sharing. Until they turn this setting on, you won't see the option to share forms with people outside your organization.
Here's how an admin enables it:
Step 1: Open the Microsoft 365 admin center
Go to admin.microsoft.com and sign in with an admin account. You need Global Administrator or at least Forms Administrator permissions.
Step 2: Navigate to Org settings
In the left sidebar, go to Settings > Org settings. Under the Services tab, scroll down and select Microsoft Forms.
Step 3: Enable external sharing
On the Microsoft Forms pane, find the External sharing setting and check "Send a link to the form and collect responses". This lets anyone in your organization share forms externally, including with people who don't have a Microsoft account.
Step 4: Save and wait
Select Save changes. Changes can take up to 24 hours to propagate across your tenant, though they usually take effect within a few minutes. If the option doesn't appear right away, wait 15 minutes and refresh the page before troubleshooting further.
If you're not an admin, you'll need to request this change from your IT department. Send them the direct path: admin.microsoft.com > Settings > Org settings > Microsoft Forms. Without this setting enabled, the "Anyone can respond" option will not appear when you try to share a form.
How to Share Microsoft Forms with External Users
Once external sharing is enabled at the admin level, you can share any form with people outside your organization. Here's how:
Step 1: Open your form
Go to forms.office.com and open the form you want to share (or create a new one).
Step 2: Click "Collect responses"
Click the Collect responses button in the top-right corner of the form editor. This opens the sharing panel.
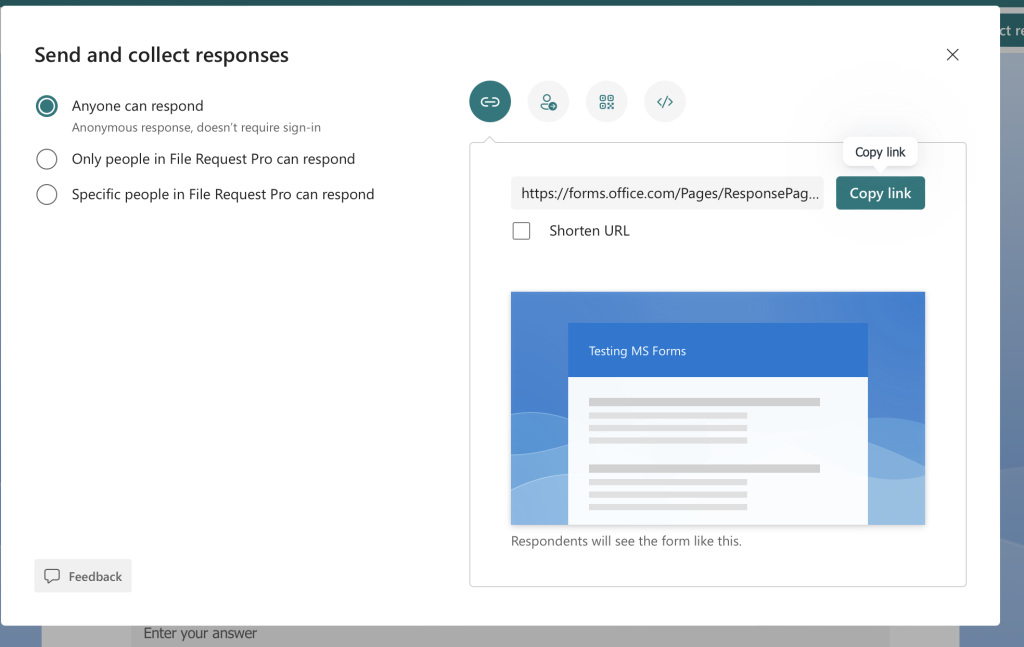
Step 3: Set the audience to "Anyone can respond"
At the top of the sharing panel, you'll see a dropdown that controls who can fill out the form. Select "Anyone can respond" (tenants on the older UI show this as "Anyone with the link can respond"; it's the same setting). This allows external users, including people without a Microsoft account, to submit responses.
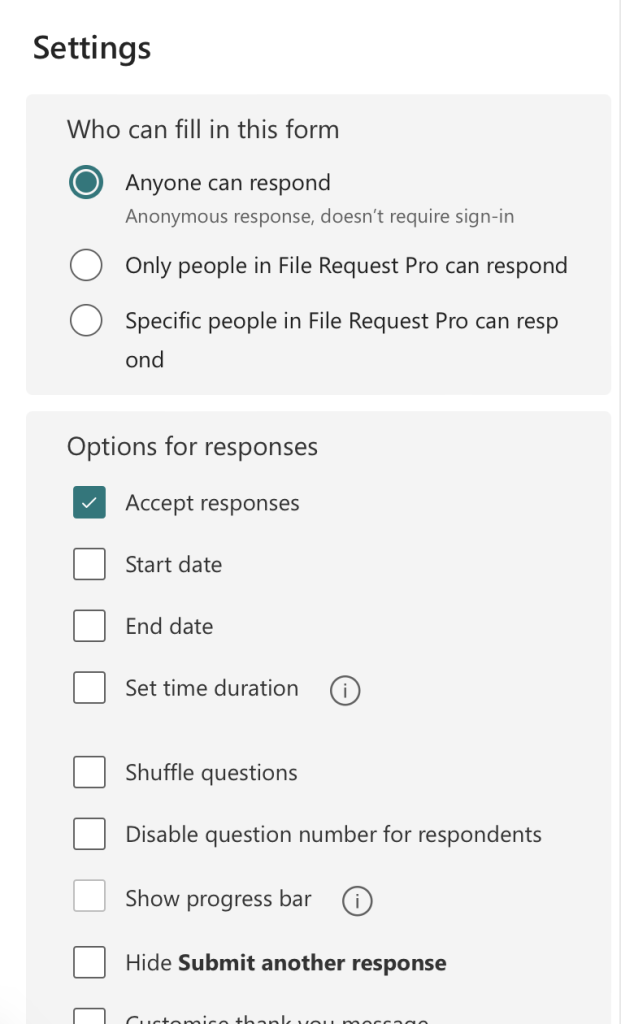
The other options are:
- Only people in my organization can respond — Requires sign-in with a work or school account from your tenant.
- Specific people in my organization can respond — Only named users can submit.
Step 4: Copy and share the link
Click Copy to generate the shareable link. Send this link via email, Slack, social media, or any other channel.
Other Ways to Share Microsoft Forms Externally
A direct link isn't the only way to share your form with external respondents. Microsoft Forms offers four other sharing methods.
Share via email
After clicking "Collect responses," select the email icon. Enter the recipient's email addresses and add a custom message. Microsoft Forms sends the invitation directly from your account.
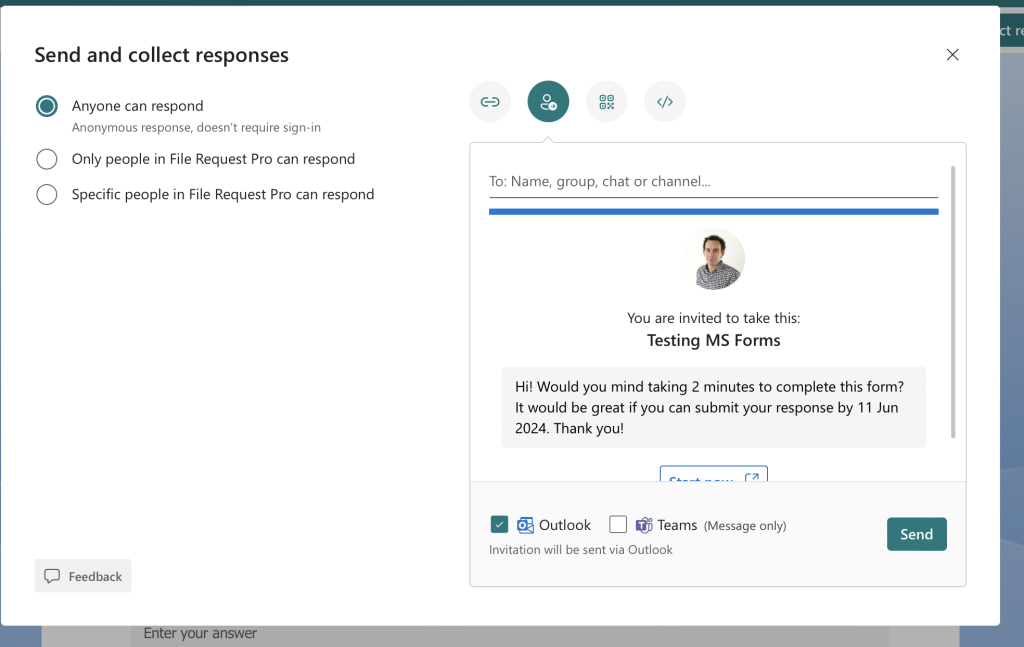
This works well for small groups, but for large distribution lists, copying the link and using your own email tool gives you more control over formatting and tracking.
Share via QR code
In the "Collect responses" panel, click the QR code icon to generate a scannable code. Download the image and add it to printed materials, presentations, event signage, or anywhere a physical audience needs quick access to the form.
QR codes are especially useful for:
- Event feedback forms displayed on screens or printed handouts
- Conference or trade show surveys
- In-store or on-site feedback collection
- Training session evaluations
Make sure you've set the form to "Anyone can respond" before generating the QR code — otherwise, external users who scan it will hit a login wall.
Embed on a website
Click the embed icon (</>) in the sharing panel to generate an iframe embed code. Copy and paste this into the HTML of any webpage. The form renders directly on your site, so visitors can respond without leaving the page.
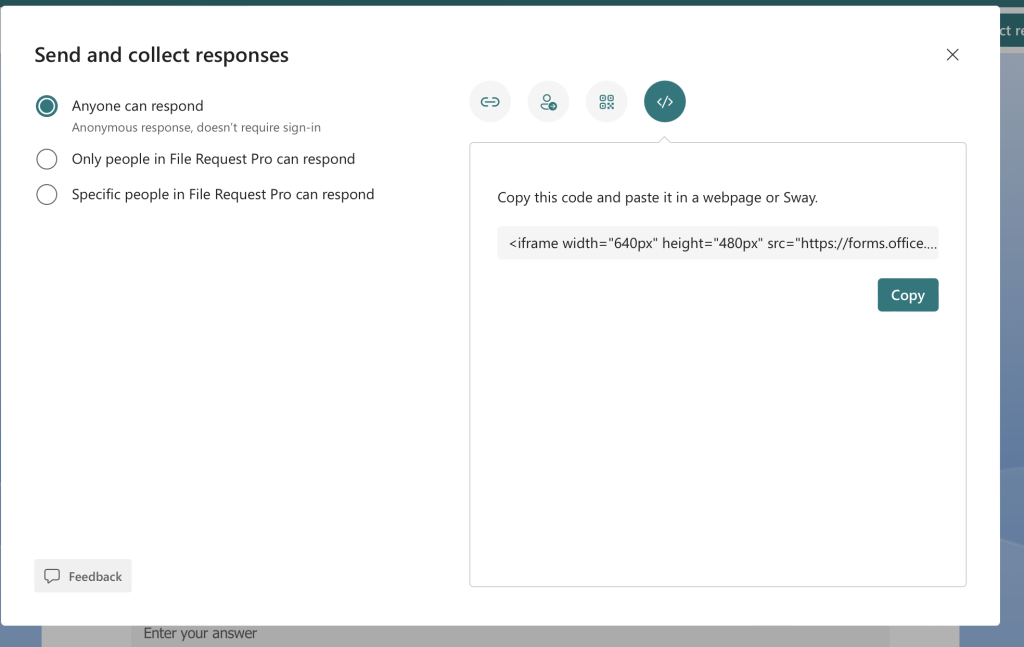
For a detailed walkthrough — including WordPress, SharePoint, and Outlook embedding — see our guide on how to embed a Microsoft Form in a website.
Share in Microsoft Teams
You can share a form directly in a Teams channel or chat. In the "Collect responses" panel, select the Teams icon and choose the channel. Team members can fill out the form without leaving Teams. This also works for external guests who have been invited to your Teams workspace.
How to Make Microsoft Forms Public
Making a Microsoft Form "public" means anyone with the link can open and submit it. No sign-in, no Microsoft account, no organizational restrictions. It's the same mechanism as external sharing, but it deserves its own walkthrough because so many people search for it by this name.
- Open the form in the editor at forms.office.com.
- Click Collect responses in the top-right corner. This opens the "Send and collect responses" panel.
- In the audience dropdown at the top, select "Anyone can respond." The other two options ("Only people in my organization can respond" and "Specific people in my organization can respond") both force respondents to sign in, which defeats the purpose of a public form.
- Pick a distribution method. The panel gives you a copyable link (with an option to shorten the URL), an email or Teams invitation, a QR code, and an embed code for your website.
- Test it: open the link in an incognito window. If the form loads without a sign-in prompt, it's public.
One distinction worth knowing: this makes your form public to respond to. Nobody can edit your questions. Edit access is a separate setting, covered in the collaboration question in the FAQ below.
If you want fully anonymous responses as well, go to the form's Settings (gear icon) and uncheck "Record name". This stops Microsoft Forms from collecting any identifying information. Response rates tend to be higher when respondents know their name isn't attached.
Note for organizational accounts: The "Anyone can respond" option only appears if your Microsoft 365 admin has enabled external sharing (see the admin settings section above). If it's missing, that's the first thing to check.
How to Share Microsoft Forms Outside Your Organization
Sharing forms outside your organization follows the same steps as sharing with external users, but here's a quick checklist so you don't miss anything:
- Confirm admin settings are enabled. Ask your IT admin to verify that external sharing is turned on in the Microsoft 365 admin center under Settings > Org settings > Microsoft Forms.
- Open the form and click Collect responses.
- Select "Anyone can respond." This is the only option that works for people outside your organization.
- Avoid file upload questions. If your form includes a file upload question, external sharing gets restricted (more on this below).
- Copy the link and share it via email, chat, QR code, or embed.
- Test it. Open the link in an incognito/private browser window to confirm that it works without requiring a Microsoft sign-in.
If you need to collect files from people outside your organization, see the file upload limitations section below or explore OneDrive file requests as an alternative for simple file collection.
Fix: "Anyone Can Respond" Option Greyed Out
This is one of the most common issues in Microsoft Forms, and one of the most confusing. You go to share your form, and the "Anyone can respond" option is greyed out or missing entirely. Before you email your admin, run one quick test, then work through the causes below in order.
First, test whether external sharing already works
Open the response link of any form you've already set up in an incognito or private browser window. If the form loads without a sign-in prompt, external sharing is enabled for your tenant, and the problem is specific to the form you're stuck on (see causes 2, 4, and 5). If you hit a sign-in wall on every form, the tenant-level setting is the likely culprit (cause 1).
Cause 1: Your admin hasn't enabled external sharing
This is the most common reason. By default, many Microsoft 365 tenants restrict forms to internal users only.
Fix: Ask your Microsoft 365 administrator to enable external sharing. They need to go to admin.microsoft.com > Settings > Org settings > Services > Microsoft Forms and check "Send a link to the form and collect responses" under External sharing.
Cause 2: Your form contains a file upload question
This is the second most common cause — and the one that often catches people off guard. Microsoft Forms does not allow external users to upload files. If your form includes even one file upload question, the sharing options automatically lock to "Only people in my organization can respond."
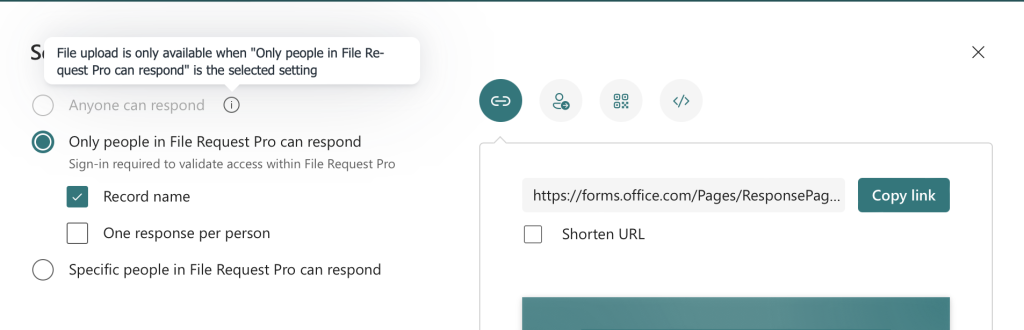
Fix: Remove the file upload question to unlock external sharing. If you need to collect files from external users, you have three options:
- Remove the upload question and add a text field asking respondents to share a link to their file (via Google Drive, Dropbox, etc.).
- Use OneDrive file requests alongside your form to collect files separately.
- Use a dedicated file collection tool like File Request Pro that supports external file uploads with form fields, automated reminders, and cloud storage integrations.
For more detail, see our guide on Microsoft Forms file upload limits and the greyed-out fix.
Cause 3: You're using a personal account with organizational restrictions
In rare cases, if your account is a personal account that's been added as a guest to an organization, you may inherit some of that organization's restrictions. Try creating the form from a standalone personal account or a different organizational account.
Cause 4: The form was created from a template
Forms built by duplicating a template can inherit the template's restricted sharing settings, and the audience dropdown stays locked even after your admin enables external sharing. Fix: Create a new blank form and copy your questions across. Rebuilding takes a few minutes and clears the inherited restriction.
Cause 5: The form belongs to a group, or it's a quiz with sign-in settings
Forms created inside a Microsoft 365 group or a Teams channel belong to the group rather than to you, and their sharing options can differ from those on a form you create under your own account. Quizzes add one more wrinkle: settings that identify the respondent, like "Record name" and "One response per person", only work for signed-in users from your organization, so they conflict with open access. Fix: For a group form, recreate it under your own account at forms.office.com. For a quiz, turn off the settings that require sign-in, then check the audience dropdown again.
Quick troubleshooting checklist
| Symptom | Likely Cause | Fix |
|---|---|---|
| "Anyone can respond" is greyed out | Admin hasn't enabled external sharing | Contact your Microsoft 365 admin |
| "Anyone can respond" disappears when you add a question | File upload question added | Remove the file upload question |
| Option shows but external users get a login screen | Setting not yet propagated | Wait up to 24 hours after admin change |
| External user sees "You need permission" | Wrong sharing setting selected | Switch to "Anyone can respond" |
| Dropdown locked on a form copied from a template | Template's restricted sharing carried over | Rebuild as a new blank form |
| Sharing options differ from your other forms | Form is owned by a group or Teams channel | Recreate it under your own account |
| Quiz won't offer "Anyone can respond" | A quiz setting requires sign-in | Turn off "Record name" and "One response per person" |
Sharing Forms with File Upload Questions: The Limitation
Microsoft Forms does not accept file uploads from people outside your organization. Add even one file upload question and the audience options lock to "Only people in my organization can respond", and no admin setting changes that. If you need both answers and files from external people, pair your form with OneDrive file requests, or use a tool like File Request Pro that collects form fields and files on a single page. Our guide to Microsoft Forms file upload outside your organization walks through every workaround in detail.
Tips for Sharing Microsoft Forms Externally
Practical tips to avoid common mistakes with external sharing:
- Always test in a private browser window. After setting up external sharing, open the form link in an incognito window. This shows you exactly what an external respondent sees, so you can catch login walls or broken formatting before sending the link out.
- Keep the form short. External respondents won't feel obligated to finish a long form. Aim for 10 questions or fewer.
- Add a clear title and description. External users don't have the context that internal employees do. Explain who you are, why you're collecting this information, and how their data will be used.
- Set a deadline if needed. Under form settings, you can set a start and end date. This prevents stale responses trickling in weeks after you've already analyzed the data.
- Monitor responses. Check the Responses tab regularly. You can also set up a Power Automate flow to get notified by email or Teams message every time someone submits a response.
- Consider anonymous submissions. If you don't need to identify respondents, disable name recording in settings. This reduces friction for external users. See our guide on making Microsoft Forms anonymous for details.
Frequently Asked Questions
How do I share a Microsoft Form with someone outside my organization?
Open your form, click "Collect responses," and select "Anyone can respond" from the dropdown. Copy the link and send it to your external recipients. If this option isn't available, your Microsoft 365 admin needs to enable external sharing in the admin center under Settings > Org settings > Microsoft Forms.
Why is the "Anyone can respond" option greyed out in Microsoft Forms?
Two main reasons: your Microsoft 365 administrator hasn't enabled external sharing, or your form contains a file upload question. File upload questions automatically restrict sharing to internal users only. Remove the file upload question or contact your admin to resolve this.
Can external users upload files through Microsoft Forms?
No. Microsoft Forms does not support file uploads from people outside your organization. If your form includes a file upload question, it can only be shared internally. To collect files from external users, use OneDrive file requests or a dedicated file collection tool like File Request Pro.
How do I make a Microsoft Form public so anyone can fill it out?
Click "Collect responses" and select "Anyone can respond." This makes the form accessible to anyone with the link — no Microsoft account or sign-in required. If you also want anonymous responses, go to Settings and uncheck "Record name."
Do external users need a Microsoft account to fill out my form?
No. When you set the form to "Anyone can respond," respondents can fill it out without signing in or having any Microsoft account. They just need the link and a web browser.
How long does it take for external sharing settings to take effect?
After an admin enables external sharing in the Microsoft 365 admin center, changes typically take effect within a few minutes but can take up to 24 hours to fully propagate across all users in the tenant.
Can I share a Microsoft Form via QR code with external users?
Yes. In the "Collect responses" panel, click the QR code icon to generate a scannable code. Make sure you've first set the form to "Anyone can respond" — otherwise, external users who scan the QR code will be prompted to sign in.
What's the difference between sharing a form and collaborating on a form with external users?
Sharing a form means external users can respond to it. Collaborating means they can edit the form's questions and structure. To let someone outside your organization collaborate on editing a form, click the "Share" button (not "Collect responses"), select "Get a link to view and edit," and send them the link. Your organization's settings control which collaboration options are available.
