Microsoft Forms lets you build surveys, quizzes, and feedback forms inside Microsoft 365. But most people don't want their form sitting behind a separate link. They want it on their website, where visitors can fill it out without leaving the page.
This guide covers the full process: generating the embed code, adding the form to HTML pages, WordPress, SharePoint, and Outlook. It also covers the most common embedding failures and a limitation with file upload questions.
How to Generate a Microsoft Forms Embed Code
Before you can embed a form anywhere, you need the iframe embed code from Microsoft Forms.
Step 1: Open your form
Go to forms.office.com, sign in with your Microsoft 365 account, and open the form you want to embed (or create a new one).
Step 2: Click "Collect Responses"
Click the Collect Responses button in the top-right corner of the editor (it may appear as Send in some versions). This opens the sharing panel.
Step 3: Set sharing permissions
This step causes the majority of embedding failures. At the top of the sharing panel, a dropdown controls who can fill out the form:
- Anyone can respond — Fully public. No sign-in required. This is the setting you need for website embeds.
- Only people in my organization can respond — Requires Microsoft 365 sign-in. External visitors will see a login wall.
- Specific people in my organization can respond — Only named users can submit.
For a public website, select "Anyone can respond." If you leave the default (often "Only people in my organization"), every external visitor will hit a login prompt instead of seeing your form. For a complete walkthrough of all sharing options, see our guide on how to share Microsoft Forms with external users.
Step 4: Click the Embed icon
In the sharing panel, click the embed icon (it looks like < />). Microsoft Forms generates an iframe snippet:
<iframe width="640px" height="480px" src="https://forms.office.com/Pages/ResponsePage.aspx?id=YOUR_FORM_ID" frameborder="0" style="border: none; max-width:100%; max-height:100vh" allowfullscreen></iframe>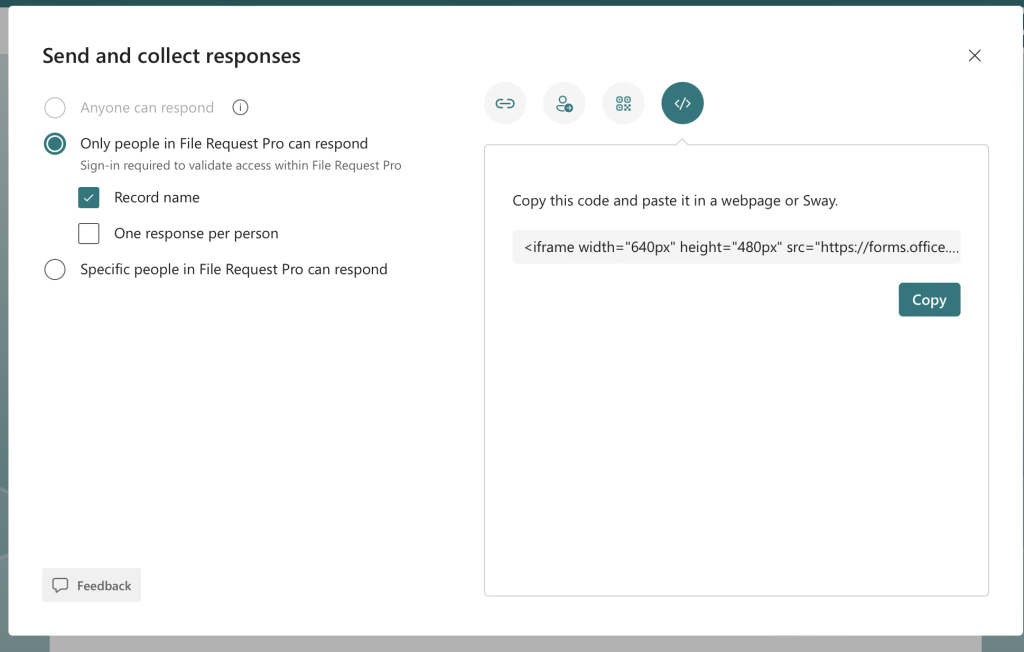
Step 5: Copy the embed code
Click Copy. You now have everything you need to embed the form on any web page.
How to Embed a Microsoft Form in a Website
Open the HTML file for the page where you want the form, and paste the iframe code wherever the form should appear:
<div class="form-container">
  <iframe width="100%" height="800px"
    src="https://forms.office.com/Pages/ResponsePage.aspx?id=YOUR_FORM_ID"
    frameborder="0" style="border: none; max-width:100%;"
    allowfullscreen>
  </iframe>
</div>
Adjust width and height
The default 640x480 works for short forms. For longer forms, increase the height to prevent an internal scrollbar:
- Short form (3-5 questions):
height="480px" - Medium form (6-12 questions):
height="800px" - Long form (12+ questions):
height="1200px"or higher
Set width to 100% for responsive layouts so the form fills its container on any screen size.
Test the form
Open the page in an incognito window (so you're not signed in to Microsoft 365). Verify the form loads, every question is visible, and the submit button works. If you see a login prompt, go back and set sharing to "Anyone can respond."
How to Embed a Microsoft Form in WordPress
WordPress strips raw HTML from standard paragraph blocks, so you need a specific block type.
Block Editor (Gutenberg)
- Open the page or post in the Block Editor.
- Click + to add a new block and search for "Custom HTML."
- Paste the Microsoft Forms iframe code into the block.
- Click Preview to verify the form renders, then publish.
Custom HTML widget (sidebars)
Go to Appearance > Widgets, add a Custom HTML widget to the desired area, and paste the iframe code. Set width to 100% so it fits the sidebar.
Elementor
Drag an HTML widget onto the page in Elementor's visual editor, paste the iframe code, and set width to 100%.
Note: Some WordPress security plugins (Wordfence, iThemes Security) strip iframe tags from content. If the form disappears after saving, whitelist forms.office.com in your security plugin settings.
How to Embed a Microsoft Form in SharePoint
SharePoint has native support for Microsoft Forms, so embedding takes fewer steps than on any other platform.
Microsoft Forms web part (recommended)
- Edit a modern SharePoint page (classic pages don't support this web part).
- Click + and search for "Microsoft Forms."
- Select an existing form or paste a form URL.
- Choose whether to collect responses or display results.
- Click Publish.
The Forms web part handles responsive sizing automatically. No iframe or dimension adjustments needed.
Alternative: Embed web part
For more control over display dimensions, use the generic Embed web part and paste the iframe code directly. This gives you manual sizing control but skips the auto-sizing and native styling of the Forms-specific web part.
On classic SharePoint pages, use a Content Editor or Script Editor Web Part to insert the iframe manually. Some organizations have disabled script injection for security.
How to Embed a Microsoft Form in Outlook Email
This is one of the most searched questions about Microsoft Forms, and the answer disappoints most people.
You cannot embed a live form inside an email
Every major email client (Outlook, Gmail, Apple Mail) strips iframes and JavaScript from email content for security. There is no way to paste the embed code into an email and have a working form appear. The form will be invisible or display as broken HTML.
This isn't a Microsoft-specific limitation. It's a universal email security restriction.
What works: share a form link
From the "Collect Responses" panel in Microsoft Forms, copy the shareable link (not the embed code) and paste it into your email. To improve click-through rates:
- Use a descriptive hyperlink: "Fill out our feedback form" instead of a raw URL.
- Add a call-to-action button using Outlook's formatting tools.
- Briefly explain what the form is and how long it takes to complete.
Outlook Actionable Messages: a partial workaround
Outlook Actionable Messages let you embed interactive cards with simple inputs (text fields, date pickers, multiple-choice buttons) directly inside Outlook emails. They only work in Outlook, though, and support only basic input types, not full Microsoft Forms. Building one requires a JSON card payload using the Adaptive Cards framework and a registered sending domain. They're designed for developer-built workflows like approval requests, not survey forms.
For most users, a form link in the email body is the simplest and most reliable option.
Embedding Microsoft Forms with File Upload Questions
This is where many teams hit an unexpected wall. You build a form with a file upload question, embed it on your website, and discover that external visitors can't upload anything.
The limitation
Microsoft Forms file upload questions require every respondent to be signed in to a Microsoft account. This applies whether the form is accessed via a direct link or through an embedded iframe. Visitors who aren't signed in will see an authentication prompt on the file upload field. They can still fill out text and multiple-choice questions, but file uploads are locked behind sign-in. For a deeper look at what's possible (and what's not), see our guide on how to enable file uploads in Microsoft Forms.
For public website embeds, this is a deal-breaker. Most visitors won't have a Microsoft account or won't want to authenticate to upload a document. Client onboarding forms, vendor submissions, application forms with attachments: all of these break down when external users can't upload files without signing in.
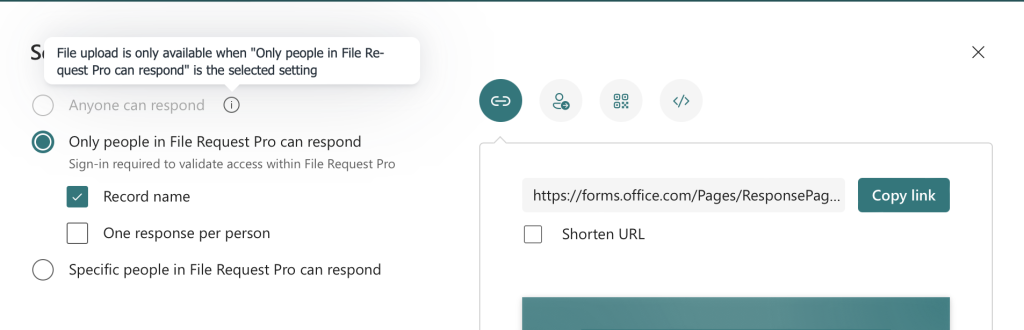
Workaround: use a dedicated file collection tool
If collecting files from external users is a core requirement, File Request Pro removes the sign-in barrier. You build branded upload pages that anyone can use. Respondents open the page, fill in fields, drag in files, and submit. No account required.
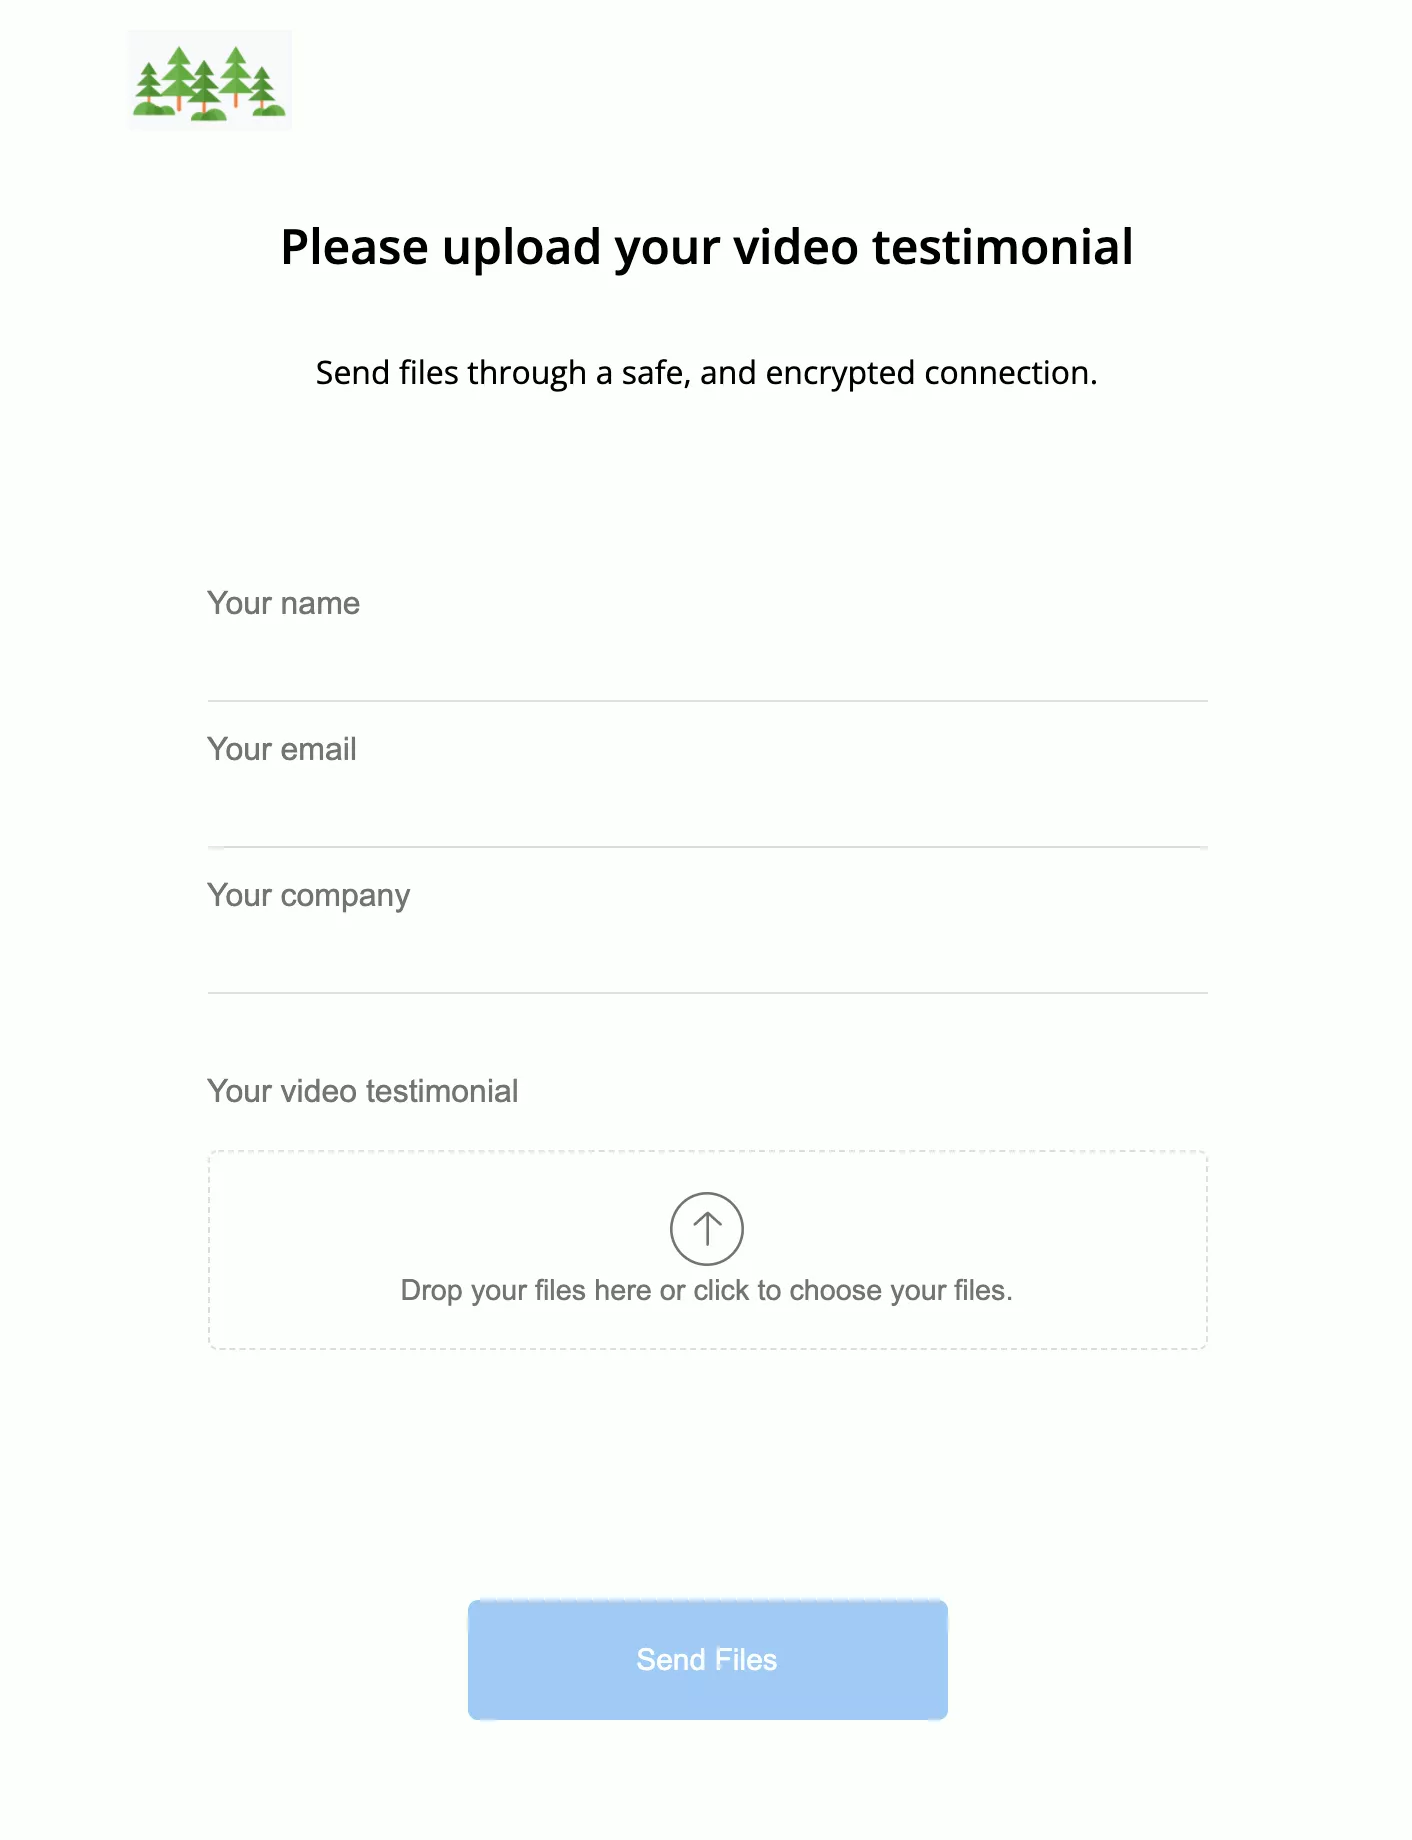
How it differs from Microsoft Forms file uploads:
- No sign-in required — External clients, vendors, and the public can upload files immediately.
- Large file support — Up to 5 GB per file, with 1 TB/month bandwidth on paid plans.
- Automatic file organization — Files sorted into folders by respondent name, date, or custom field.
- Native Microsoft integration — Uploaded files route directly to your OneDrive or SharePoint.
- Embeddable — Upload pages embed on your website via iframe, the same way a Microsoft Form does.
Troubleshooting: Microsoft Form Not Embedding Correctly
If your embedded form shows a login prompt, loads blank, or doesn't appear at all, work through these causes in order.
1. Wrong sharing settings
Symptom: Login page or "access denied" instead of the form.
Fix: In Collect Responses, change to "Anyone can respond" and re-copy the embed code. This is the most common problem.
2. Content Security Policy (CSP) blocking the iframe
Symptom: Blank space where the form should be; CSP errors in browser console.
Fix: Add forms.office.com to your site's CSP frame-src directive:
Content-Security-Policy: frame-src 'self' https://forms.office.com;3. Embed code is incomplete
Symptom: "Page not found" inside the iframe.
Fix: Re-copy the full iframe from Microsoft Forms. Some CMS platforms truncate code pasted into plain text fields. Use an HTML/code field instead.
4. Form deleted or unpublished
Symptom: "This form doesn't exist" message.
Fix: Confirm the form is still active in Microsoft Forms. Re-generate the embed code if the form was recreated.
5. HTTPS mismatch
Symptom: Form loads locally but not on the live site.
Fix: Microsoft Forms requires HTTPS. If your site uses HTTP, browsers block the iframe as mixed content. Install an SSL certificate.
6. Iframe height too small
Symptom: Form cut off with an internal scrollbar.
Fix: Increase the height attribute. There's no auto-height for cross-origin iframes, so set it manually.
Quick reference
| Symptom | Cause | Fix |
|---|---|---|
| Login prompt | Sharing set to organization only | Change to "Anyone can respond" |
| Blank space | CSP blocking iframe | Add forms.office.com to frame-src |
| Form cut off | Iframe height too small | Increase height attribute |
| "Form not found" | Deleted or wrong URL | Re-copy embed code |
| Broken on live site | HTTPS mismatch | Enable SSL |
Microsoft Forms Embed FAQ
Can I embed a Microsoft Form on any website?
Yes. The embed code is a standard iframe that works on any site where you can add custom HTML (WordPress, Squarespace, Wix, Webflow, or hand-coded pages). Your site must use HTTPS and not block iframes from forms.office.com via Content Security Policy.
Do respondents need a Microsoft account?
Not for standard questions. If sharing is set to "Anyone can respond," anyone can fill out the form without an account. See our guide on how to make Microsoft Forms anonymous for the full setup. The exception is file upload questions, which always require Microsoft sign-in.
Can I customize the look of an embedded form?
You can apply Microsoft Forms' built-in themes (colors and background images), which carry over to the embedded version. You can't apply custom CSS to content inside the iframe due to cross-origin restrictions. You can, however, style the container around the iframe on your own site.
Does the embedded form work on mobile?
Yes. Microsoft Forms is responsive. Set the iframe width to 100% so it adapts to the screen size.
Will responses from the embedded form appear in my Forms dashboard?
Yes. Responses from embedded forms are identical to those submitted via a direct link: same Responses tab, same Excel export, same Power Automate triggers.
Can I embed multiple forms on one page?
Yes. Each iframe operates independently. Multiple iframes increase page load time, so test performance if you're adding more than two or three.
How do I remove Microsoft branding from an embedded form?
You can't fully remove it. A "Microsoft Forms" footer appears at the bottom of every form. Microsoft 365 business plans let you replace this with your organization's name, but the footer area remains. There is no white-label option.
Can I pre-fill form fields via the embed code?
No. Microsoft Forms doesn't support URL parameters for pre-filling fields. For dynamic pre-population, you'd need a custom solution via the Microsoft Graph API or Microsoft Power Apps.
