Google Forms handles surveys and quizzes well enough. But file uploads? That's where it gets frustrating. The option is greyed out, respondents can't submit without a Google account, your storage fills up, and you're left wondering why a simple "upload your document here" field causes so many problems.
This guide covers how to add file uploads to a Google Form, the restrictions you'll run into, fixes for the most common errors, and alternatives for when Google Forms isn't enough.
How to add a file upload question in Google Forms
The setup takes about 30 seconds if your account supports it. Here's the process.
Step 1: Open or create a form
Go to forms.google.com and open an existing form or click Blank to start a new one. You need to be signed in with a Google Workspace account. Personal Gmail accounts have restrictions (more on that below).
Step 2: Add a new question
Click the + button in the floating toolbar on the right side of the form editor.
Step 3: Select "File upload" as the question type
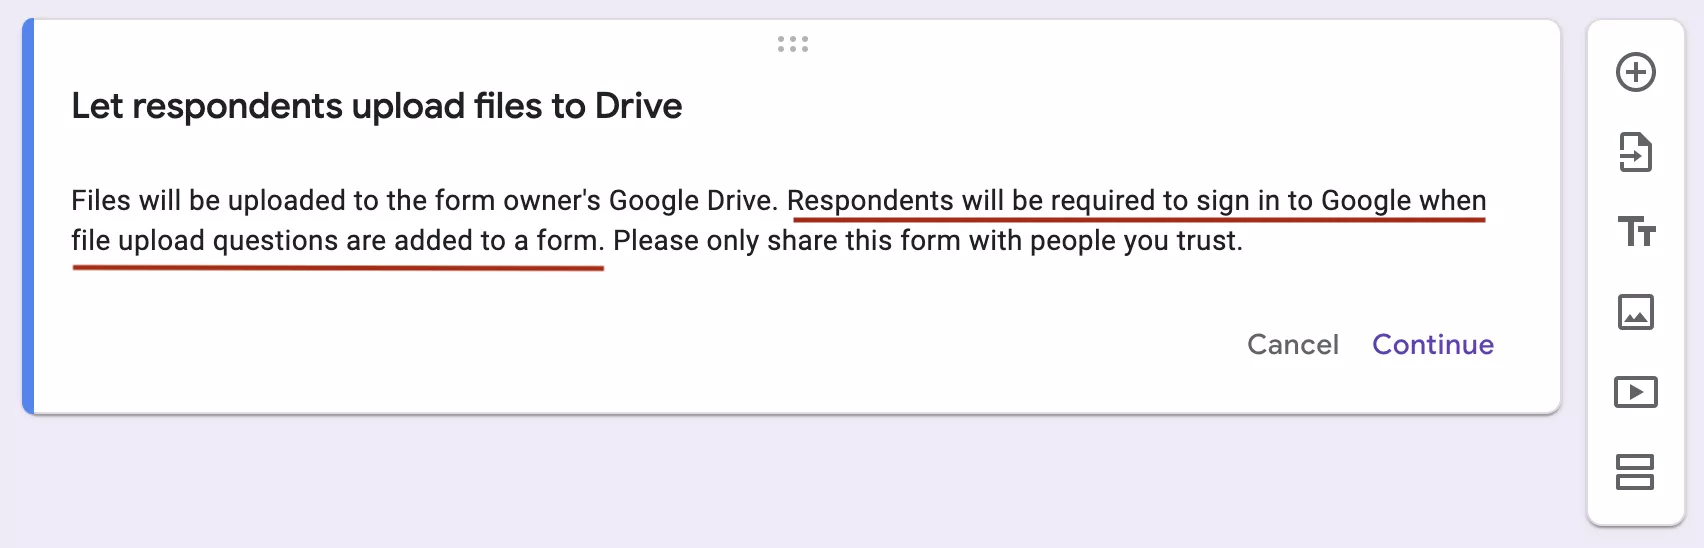
Click the dropdown menu (it defaults to "Multiple choice") and choose File upload. Google will show a notice that respondents need to sign in to their Google account to upload files. Click Continue.
If "File upload" is greyed out and you can't select it, skip to the troubleshooting section below.
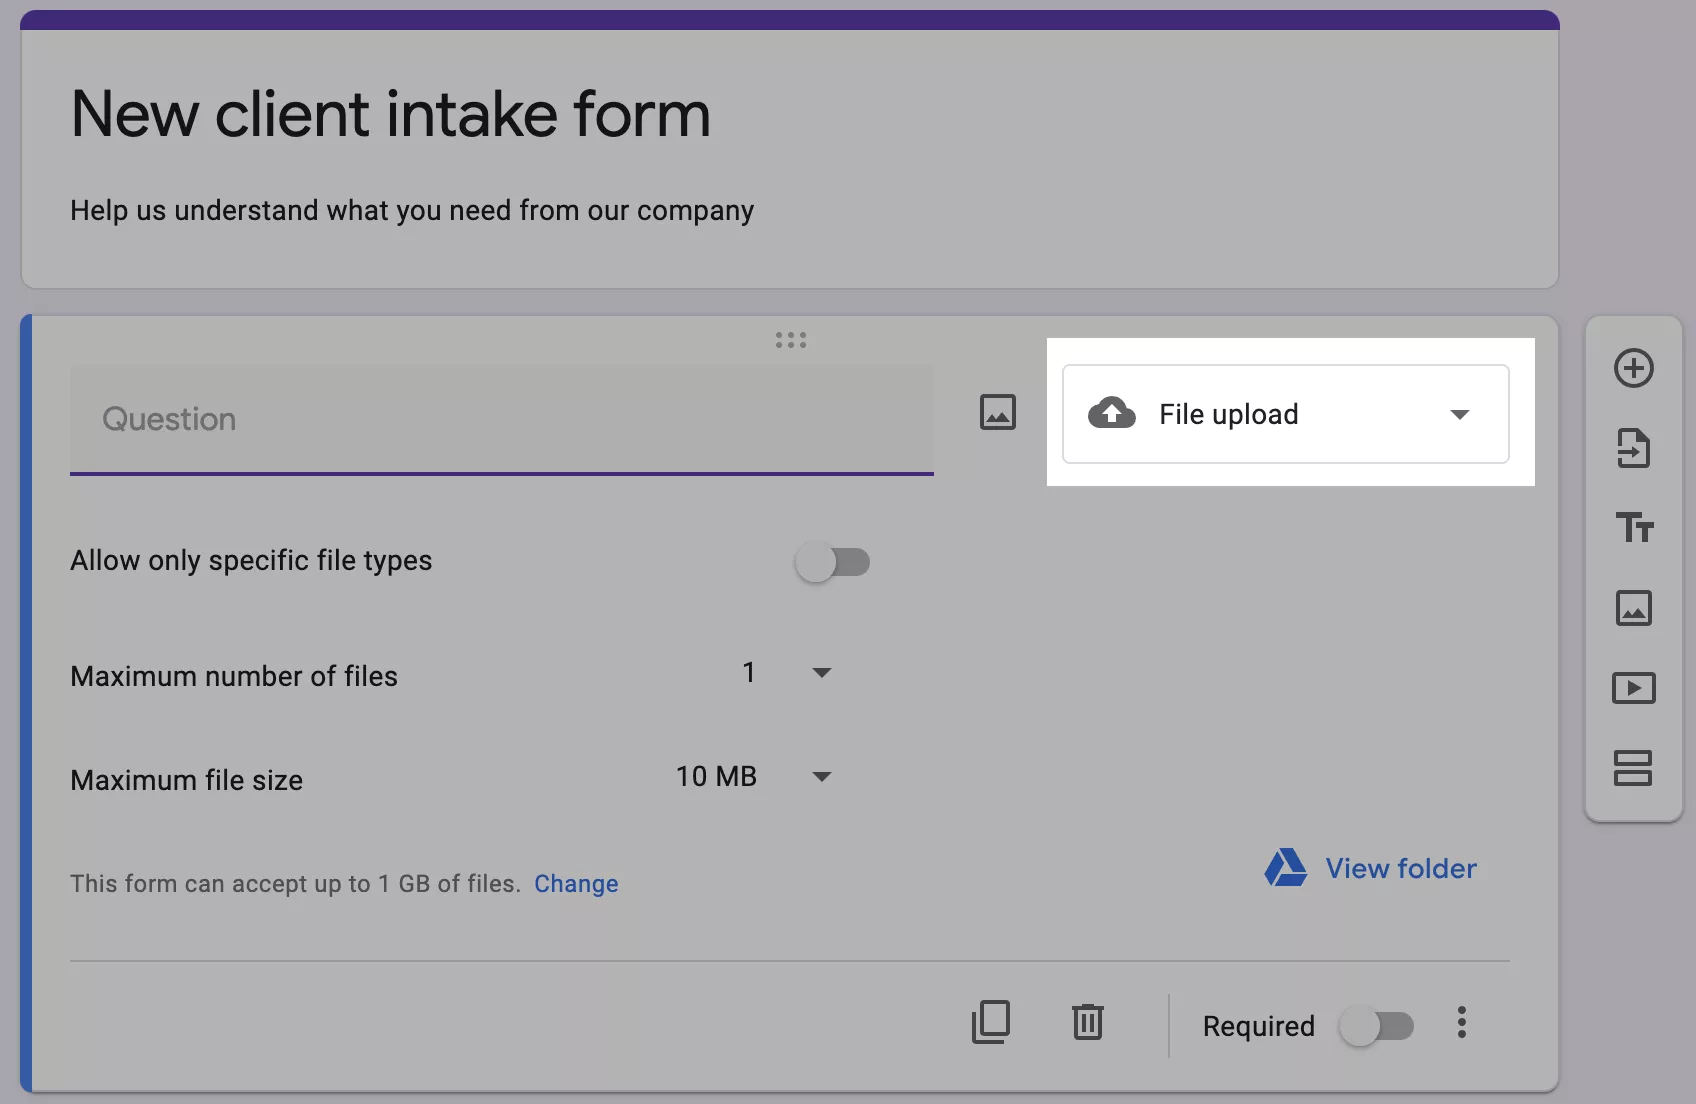
Step 4: Set file type and size restrictions
After selecting File upload, you can configure these settings:
- Specific file types - Toggle this on to restrict uploads to categories like Document, Spreadsheet, PDF, Presentation, Image, Video, or Audio.
- Maximum number of files - Choose 1, 5, or 10 files per response.
- Maximum file size - Choose 1 MB, 10 MB, 100 MB, 1 GB, or 10 GB per file.
Step 5: Set the form-level storage limit
At the top of your form, you'll see an overall storage allocation. The default is 1 GB total across all responses. You can increase it up to 1 TB if your Google Drive has the space. Every file uploaded counts against your Drive quota, not the respondent's.
Step 6: Send the form
Click Send and share the form via email, link, or embed code. If you want to place it on a webpage, see our guide on how to embed a Google Form on any website.
One thing to know before you hit send: every respondent must sign in with a Google account. There is no way around this within Google Forms.
File upload limits and restrictions
Before you send your form to a large group, here's what you're working with.
File size limits
| Setting | Options |
|---|---|
| Max file size per upload | 1 MB, 10 MB, 100 MB, 1 GB, or 10 GB |
| Max files per question | 1, 5, or 10 |
| Total form storage limit | 1 GB (default) up to 1 TB |
| Storage counted against | Form creator's Google Drive quota |
That last row is the one that catches people off guard. Free Google accounts get 15 GB total, shared across Gmail, Drive, and Photos. A handful of video submissions can fill your quota fast. Once your Drive is full, respondents see an error and can't upload. You won't get a notification when this happens.
Allowed file types
When you turn on "Allow only specific file types," Google Forms offers these categories:
- Document - .doc, .docx, and Google Docs
- Spreadsheet - .xls, .xlsx, and Google Sheets
- PDF - .pdf files only
- Presentation - .ppt, .pptx, and Google Slides
- Image - .jpg, .png, .gif, .bmp, .tiff
- Video - .mp4, .avi, .mov, .wmv
- Audio - .mp3, .wav, .aac
There's no option for custom file extensions. If you need to collect .json files, CAD drawings (.dwg), ZIP archives, or any specialized format, you either leave file type restrictions off entirely (accepting anything) or ask respondents to rename files before uploading. Neither option is great.
The Google account requirement
This is the biggest limitation: every respondent must be signed in to a Google account to upload files. No exceptions, no workarounds within Google Forms.
If your respondents don't have Google accounts, or they're on company networks that block Google sign-in, they can't submit files through your form.
Google Forms file upload without sign-in: is it possible?
Short answer: no. Google Forms cannot collect file uploads from people who aren't signed in to a Google account. This applies to free Gmail accounts, Google Workspace, and Workspace for Education.
This matters more than it sounds. When you send a file upload form to external clients, vendors, or the public, you're asking them to:
- Have a Google account (many business users rely on Outlook/Microsoft 365)
- Be signed in to that account in their current browser
- Trust your form enough to authenticate before seeing the full form
Each step loses people. Requiring sign-in for file uploads means a chunk of respondents never complete the submission. They hit the Google login screen, don't have credentials handy (or don't have a Google account at all), and leave.
Workarounds people try
Pasting a Google Drive link. You add a "Short answer" question and ask respondents to share a Drive link to their file. The problem: you're relying on each person to upload the file to their own Drive, set sharing permissions correctly, and paste the right link. You'll end up with "access denied" errors, expired shares, and links that don't work.
Using two separate forms. One public form for text fields, a second (requiring sign-in) for file uploads. This technically works but the user experience is poor. Drop-off between form one and form two is high.
Third-party add-ons. Some Google Forms add-ons claim to enable file uploads without sign-in. These typically use their own storage rather than Google Drive, and they add complexity and cost. Most have limited file size support and unreliable uptime.
If you need to collect files from people who don't have Google accounts, Google Forms is the wrong tool. A dedicated file collection tool like File Request Pro lets anyone upload files through a simple link without creating an account or signing in to anything. Files go straight to your Google Drive, Dropbox, OneDrive, or SharePoint.
"Forms containing file upload questions are not compatible"
If you see the error message "Forms containing file upload questions are not compatible" (or a variation like "This form is not compatible with file upload questions"), here's what's happening and how to fix it.
This error has a few causes.
The form is stored in a Shared Drive
This is the most common trigger. Google Forms does not support file upload questions on forms stored in Shared Drives (formerly Team Drives). If you created the form in My Drive and someone later moved it to a Shared Drive, the file upload questions break.
To fix this: move the form back to your personal My Drive. In Google Drive, right-click the form, select Move, and choose a folder in My Drive. The file upload questions should work again after the move.
The form was duplicated from a Shared Drive
Sometimes copying a form that contains file upload questions from a Shared Drive creates a broken copy. The new form inherits the incompatibility even though it's in My Drive.
To fix this: create a brand new form in My Drive and manually recreate the file upload questions rather than copying them.
Workspace admin restrictions
Google Workspace administrators can set policies that prevent file uploads in Forms across their organization. This triggers the same compatibility error.
To fix this: contact your IT administrator. The restriction is managed in the Google Admin Console under Security or Apps settings. The admin can create exceptions for specific users or organizational units.
The form has conflicting settings
Occasionally, certain combinations of form settings trigger the error. For example, enabling "Collect email addresses" along with "Limit to 1 response" while also using file upload questions on older Workspace configurations has been reported to cause conflicts.
To fix this: try toggling these settings off, save the form, then turn them back on one at a time to identify which combination triggers the error.
Why is file upload greyed out in Google Forms?
You open the question type dropdown and "File upload" is there but greyed out. You can see it, you just can't click it. This happens for specific reasons, and each one has a fix.
1. The form is stored in a Shared Drive
This is the cause in most cases. Google Forms does not support file uploads for forms stored in Shared Drives. No amount of permission changes will fix it while the form is there.
The fix: move the form to your personal My Drive. Right-click the form in Google Drive, select Move, and place it in a My Drive folder. After moving, the file upload option should become selectable. Uploaded files will go to your personal Drive, not the Shared Drive.
2. Data Loss Prevention (DLP) policies
Google Workspace administrators can enable DLP rules that block file uploads in Forms. This is common in enterprises, government agencies, and schools where data governance is a priority.
The fix: ask your Google Workspace administrator whether DLP policies are blocking file uploads. The admin can create an exception for your account in the Google Admin Console under Security > Data Protection.
3. Personal Google account limitations
Some users with personal Gmail accounts (not Workspace) report the file upload option being unavailable, especially in educational contexts or certain regions.
The fix: try creating the form from a Google Workspace account. Also check whether your form was created by or shared from a Workspace domain, as that can affect which features are available.
4. Too many file upload questions
Google Forms can become unstable with more than 10 file upload fields in a single form. The option may grey out after you've added several upload questions.
The fix: consolidate your upload questions. Instead of 12 separate single-file fields, use fewer questions that each accept up to 10 files.
5. Browser or cache problems
A stale browser session or conflicting extensions can cause the option to appear greyed out even when your account supports it.
The fix: hard-refresh the page (Ctrl+Shift+R on Windows, Cmd+Shift+R on Mac). Then try an incognito or private window. If it works in incognito, a browser extension is the culprit. Ad blockers are the most common offender.
Quick diagnostic table
| Symptom | Likely cause | Fix |
|---|---|---|
| File upload greyed out | Form is in a Shared Drive | Move to My Drive |
| Greyed out on Workspace account | Admin DLP policy | Contact IT admin |
| Greyed out on personal Gmail | Account type limitation | Use a Workspace account |
| Was working, now greyed out | Form moved to Shared Drive or policy change | Check Drive location and admin settings |
| Works in incognito only | Browser extension conflict | Disable extensions |
Missing file upload folders in Google Drive
When respondents upload files through Google Forms, the files land in the form creator's Google Drive. But sometimes those folders seem to disappear, or the files aren't where you expect them.
Where Google Forms saves uploaded files
Google creates an auto-generated folder in your Drive, named after the form title. Inside that folder, each file upload question gets its own subfolder. File names include the respondent's email address and a timestamp.
If you renamed the form after people started submitting, the folder name reflects the original title, not the current one. This trips people up when they search Drive for the folder by the form's current name.
The folder was moved or deleted
If someone with access to your Drive (or you, accidentally) moved the uploads folder to a different location or to the trash, new uploads may fail silently. Google Forms creates the folder once and expects it to stay where it was.
Check your Drive trash first. If the folder is there, restore it. If someone moved it, search Drive for the original form title to find it.
Storage quota exceeded
If your Google Drive is full, new uploads fail. Google Forms doesn't always show a clear error to either you or the respondent. Check your Drive storage at drive.google.com/settings/storage.
Shared Drive complications
If the form was originally in My Drive but was moved to a Shared Drive, the upload folder may still be in My Drive while the form expects to write to the Shared Drive (or vice versa). This mismatch can cause uploads to appear missing.
The cleanest fix: create a new form in My Drive, recreate your questions, and share the new form link.
Can you add file upload to a public Google Form?
No. You cannot have a truly public Google Form (one that doesn't require sign-in) with file upload questions.
Here's how it works. A "public" Google Form is one where you've unchecked "Restrict to users in [your organization]" so anyone with the link can respond. That works for text questions, multiple choice, checkboxes, and other standard question types. For more detail, see our guide on how to make a Google Form public without requiring sign-in.
But the moment you add a file upload question, Google Forms forces sign-in. For Workspace accounts, it turns on the "Restrict to users in [your organization]" setting. For personal accounts, it requires respondents to sign in to any Google account. You cannot turn this off while a file upload question exists in the form.
What this means for you
- External clients or partners without Google accounts can't upload files. They'll hit a sign-in wall before seeing the form.
- People signed in to a personal Gmail may be blocked if the form is restricted to your organization's domain.
- Anonymous file submissions are not possible. Google ties every upload to an authenticated account.
Google Forms file upload vs. dedicated file collection tools
Google Forms works for internal file collection where everyone has a Google account and volume is low. It wasn't designed as a file collection tool, though, and the limitations become obvious when you're collecting from external contacts.
| Feature | Google Forms | File Request Pro |
|---|---|---|
| Collect files without sign-in | No (Google account required) | Yes (no account needed) |
| Works on Shared Drives | No (greyed out) | Yes (Google Drive including Shared Drives) |
| Custom branding | Limited (header image and colors) | Full white-label (logo, colors, domain, CSS) |
| Automated reminders | No | Yes (scheduled email sequences) |
| File type restrictions | Broad categories only | Specific extensions (.jpg, .pdf, .dwg, .json) |
| Auto-organize uploads | All files in one Drive folder | Sorted by respondent name, email, or custom field |
| Conditional logic | Basic section branching | Field-level show/hide based on answers |
| Storage destination | Creator's Drive quota | Google Drive, Dropbox, OneDrive, or SharePoint |
| Embed on website | Yes (iframe) | Yes (iframe or JS embed) |
| Cost | Free | From $29.99/month |
When Google Forms is the right choice: internal file collection, everyone has a Google account, you don't need branding or reminders, and volume is low enough that Drive storage isn't a concern.
When you need something else: collecting files from external clients or the public, your respondents don't have Google accounts, you need professional branding, you're tired of chasing people for missing documents, or you want files automatically organized in your cloud storage.
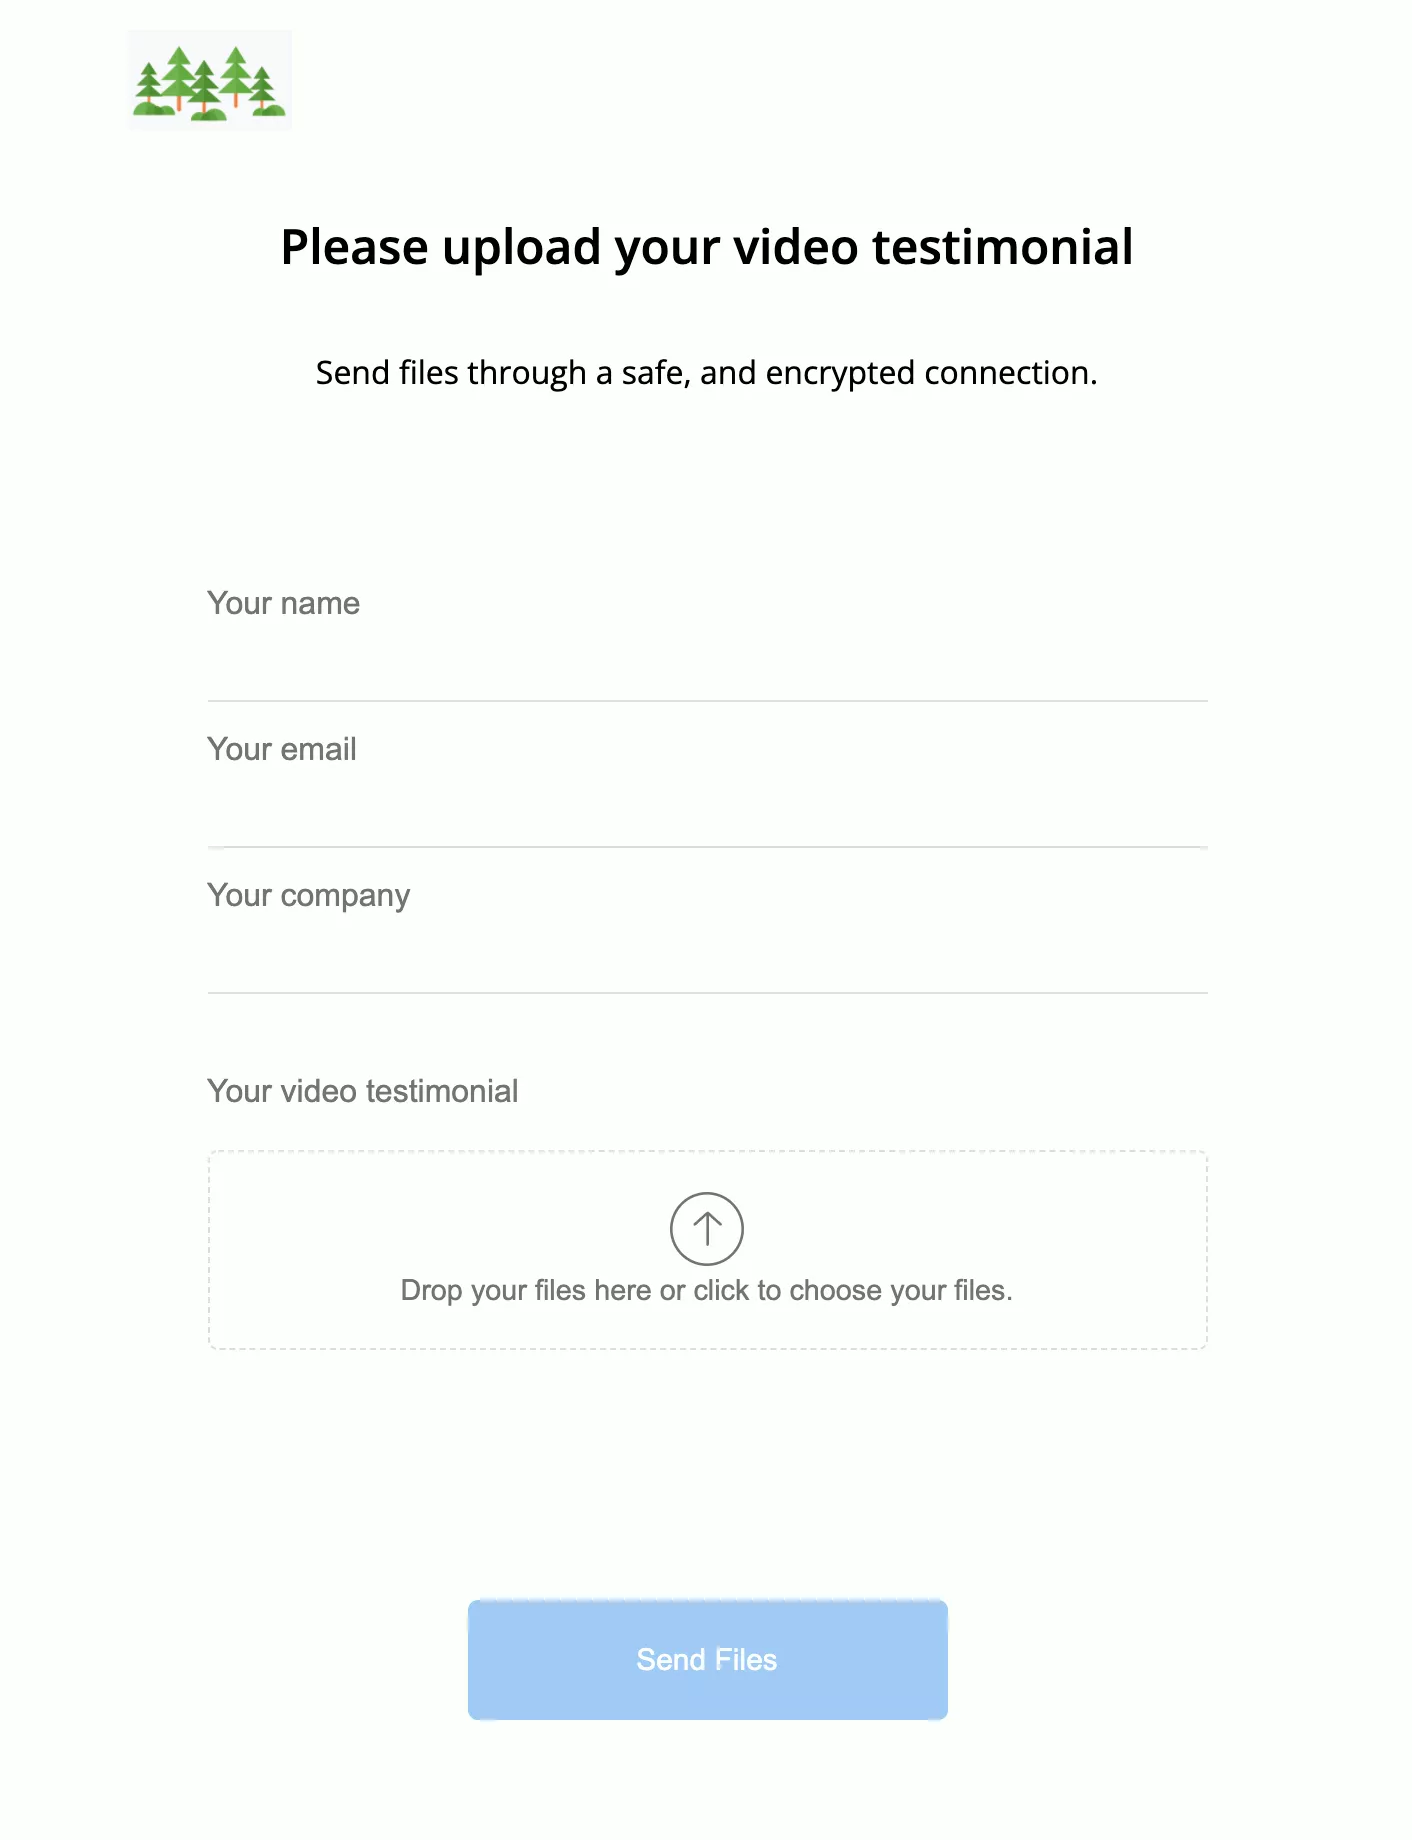
File Request Pro connects to Google Drive (including Shared Drives), Dropbox, OneDrive, and SharePoint. Respondents don't need any account. They open the link, drag in their files, fill in any form fields you've added, and submit. You get a notification, and the files are already sorted in your cloud storage.
FAQ
Can respondents upload files to Google Forms without a Google account?
No. Google Forms requires every respondent to sign in before uploading files. This applies to Gmail, Google Workspace, and Workspace for Education accounts. There is no setting to allow anonymous uploads.
Where do uploaded files go in Google Drive?
Files go to the form creator's Google Drive in a folder named after the form. Each file upload question creates a subfolder. File names include the respondent's email address. All uploads count against the creator's Drive quota. You can also let anyone upload files directly to your Google Drive without a form.
What happens when the storage limit is reached?
Respondents see an error message and can't upload files. Other question types (text, multiple choice) still work. To fix this, increase the form's storage allocation in settings or move existing files out of the uploads folder to free up space.
Can I accept .json, .zip, or other custom file types?
Not with the built-in file type filter. Google Forms only filters by broad categories: Document, Spreadsheet, PDF, Presentation, Image, Video, Audio. You can't specify individual extensions. If you leave restrictions off, respondents can upload any file type, but you can't selectively block unwanted formats.
Why did file uploads suddenly stop working?
Check these in order: (1) your Google Drive storage is full, (2) the form's total storage limit was reached, (3) someone moved the form to a Shared Drive, (4) your Workspace admin changed DLP policies. Drive storage is the cause in most cases.
Can I use file upload with Google Workspace for Education?
Yes, but your institution's admin controls access. Many schools restrict file uploads to prevent storage abuse or comply with data policies. If the option is greyed out, ask your IT department to enable it for your organizational unit.
How do I get notified when someone uploads a file?
In the Responses tab, click the three-dot menu and select "Get email notifications for new responses." You'll get an email each time someone submits the form. The uploaded files aren't attached to the email though. You'll need to open Google Drive to access them.
What does "forms containing file upload questions are not compatible" mean?
This error usually means the form is stored in a Shared Drive, which doesn't support file uploads. Move the form to My Drive to resolve it. See the full troubleshooting section above for other causes.
